8. Target Lanes
Introduction
Lanes are a convenient way of running several independent AttackSense systems at the same location and on the same Wireless network or Access Point. With lanes, you can run several systems at once, or combine several lanes together temporarily for large groups or shooting events.
For Lanes to work correctly, you need either an AttackSense Access Point, or have targets configured to work on your own WiFi network, and all targets need to be on the same network. If you use targets to generate the wireless network ( the first target switched on flashes amber and not red three times ) then you should not use lanes.
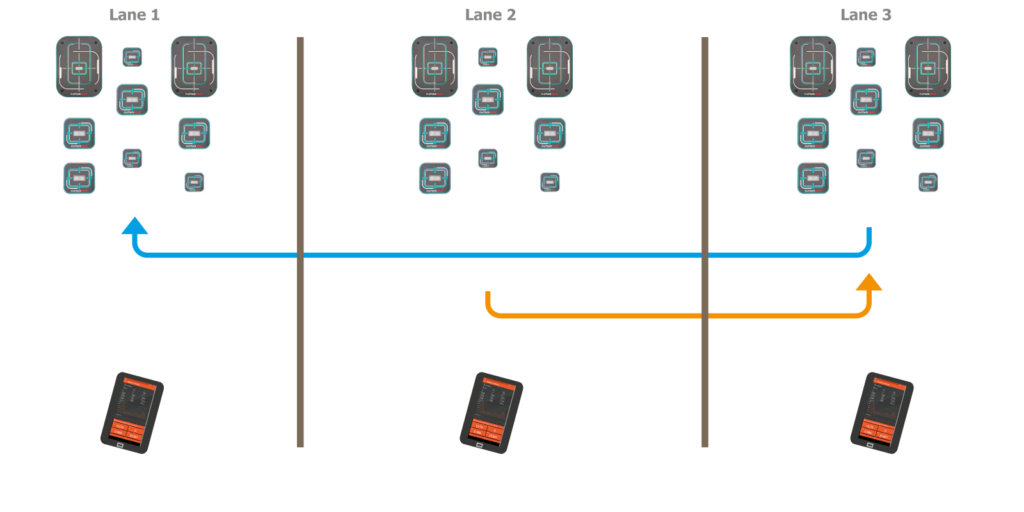
How lanes work
Each lane is assigned a unique lane number, and both targets and the AttackSense Commander app can be set to operate in a lane. When a target or app is configured to be in a lane, it will try to discover targets only in the lane it is set to operate in. Any targets that are configured to be in a different lane will be ignored, allowing multiple lanes to operate on the same network and without affecting other lanes.
When multiple lanes need to work as one, an AttackSense commander in one lane can “lend” its targets to another lane, at which point those targets work as if they are in the donated lane, and the app within the original lane can’t see those targets. When done, the donated lane AttackSense Commander app can give the targets back to the lending lane and the app in the lending lane will see the targets again.
Configuring lanes
To begin using lanes, separate and organise targets into the desired number of lanes, but leave the targets switched off for now. You will also need one tablet for each lane to run the AttackSense Commander app. You will also need to ensure you are running the most up-to-date AttackSense app and that all targets have been upgraded in the Target Configuration screen.
Firstly, ensure that all targets are on the same wireless network. If you previously used multiple wireless networks, or set Master/ Slave and / or Master Affinity on slaves to talk to specific master targets, ensure that all targets are on the same network and have their Master/Slave mode set to Auto.
Lanes are configured one lane at a time, so start with the first lane and switch on the first target which will become the master target, this should be closest to the access point in normal operation or be central to the field if you use “Shoot Master To Start Round” mode. Ensure that this target flashed red three times at startup to show it is a master.
Open up the AttackSense Commander app, then in App Settings, configure the Lane ID to the correct lane number for this lane. Note that all lanes need assigning a unique number. Press save at the bottom of the screen when done.
The app will discover the master target, make sure you see the master target in the Target Configuration screen.
Now switch on all the remainhng targets you want to be in the asigned lane, they should flash green three times to show they are connected to the master target. Make sure you can see all targets in the Target Configuration screen before continuing.
Press the three lines at the top right of the Target Configuration screen, then choose “Claim New Targets” and press “New lane (master & slaves)”.
All targets will restart, then the first target you switched on will flash red three times and the remaining targets will flash green three times”.
You have now configured the first lane. Switch off all targets, quit the app and move to the next lane, repeating the process above.
To successfully use lanes, make sure all targets after you have finished have been assigned to a lane, you should make sure that no target is on the network with a lane “not set”, as this may cause the target to appear as a master on AttackSense Commander apps.
Adding new targets to existing lanes
If you want to add additional targets to existing lanes, this can easily be done.
First, switch off all existing targets in the same lane, including the master.
Switch on the first new target you want to be in the lane. If there are multiple targets for the same lane, switch these on too after the first target has flashed red three times. Make sure you do not switch any targets on that you want to put into different lanes.
Open the AttackSense Commander app for the existing lane you want to add the targets into.
Once the AttackSense Commander app has discovered the targets, open the Target Configuration screen.
Press on the top right menu, then choose “Claim New Targets”, then press “Existing lane (slaves)”.
The targets will reset, switch the master target on for the lane and then all other targets. You will now see the new targets appear alongside the other targets in the lane. If you do not, try switching all targets in the lane off and on again.
Merging lanes
If you want to temporarily merge two or more lanes together, this can be easily achieved and targets put back into their original lanes when you want.
To merge two lanes, make sure both lanes are operational.
On the lanes you want to move targets FROM, open the Target Configuration screen and press on the top right menu and choose “Temporarily Merge”.
Select the lane you want to merge targets INTO. All targets will restart and join the other lane.
If you want to also merge targets from another lane, repeat this process on each lane you want to take targets FROM.
When you are finished using the targets and want to return them to their original lanes, on the lane all the targets are in, open the Target Configuration screen and press on the top right menu and choose “Return Merged Targets”.